UFOCapture Night Sky Observation Guide V2.0


2.3 UFOCapture setup
Step 5 Installation of UFOCapture
Step 5-1 Create directory
Create 4 directories below.
- UFO Program directory
- A directory which contains program files of UFOseries
- 15MB will be needed to contain UFO2,UFOA, and UFOOrbit.
- ex. C:\program files\UFO\
- Capture target directory
- A directory which contains captured movies, still images, log files.
- You should always keep more than 40GB of free area (assuming maximum number of clips in one night is 1000 )
- Recommended to have 100GB or larger for continuous use.
- In general, 50GB will be sufficient for one month meteor observation except trash.
- This directory must be in fast inner volume. You should optimize the volume once in a month.
- You can use volume root directory as target directory such as D:\
- ex. D:\UFO\
- Analyze output directory
- A directory which contains output of UFOAnalyzer.
- 500MB will be sufficient for a few years.
- You are recommended to make year and month sub directories.
- ex. D:\UFO\DB\2005\Dec\
- CSV data base directory
- A directory which contains results from many sites.
- 10MB will be sufficient for a few years.
- You are recommended to make year and month sub directories.
- ex: D:\UFO\CSV\2005\Dec\
Step 5-2 UFOCaptureV2 installation
- There is no special installation procedure, just expand and place it.
- Download latest UFO2 package such as "UFO205.zip" from http://sonotaco.com/soft/e_index.html.
- Expand the package by some decompression tool to appropriate directory.
- Windows Xp naively have un-zip function.
- Confirm that you got UFO2 directory and UFO2.exe in it.
- When UFO2.exe was not expanded, you should de-block security option of windows Xp.
- Open property page of the package and push de-block button before expanding.
- Move UFO2 directory as a sub directory of UFO program directory.
- In case of changing the directory of UFO2 directory.
- Run UFO2.exe.
- Open Operation sheet, and push re-install ax button.
- This operation notice the directory to your system, and is needed once when execution directory has been changed.
- In case of version up, you are recommended to overwrite UFO2 directory, then you can maintain all of your settings.
- All latest settings are kept as a file "Settings.ufi" which is not included in the package.
- Registration
- When you want to register your licence key, do steps below.
- Run UFO2.exe
- Open Operation sheet
- Push Registration button
- Fill V2 Serial Code and V2 Licence key
- When using upgrade key, check Upgrade Registration ON, and fill V1 User Name and V1 License Key also.
- Push Register button and you will get "registration succeeded" message.
- DB directory assign
- Run UFO2.exe
- Open DB sheet.
- Push "..." button of DB dir line
- Select your capture target directory as DB dir.
Step 6 Confirmation of the capture driver.
- Stop other applications, get ready your video equipments, then Run UFO2.exe .
- Confirm or select your capture hardware driver at the Video drop down list box in Input sheet.

- The name of the driver may differ a little from the official name of the hardware.
- If you use IEEE1394(DV) as capture device, select "Microsoft DV Camera and VCR"
- The driver names appear only when they are ready and not in use.
Step 7 Previewing test.
- Set resolution of video(Xi, Yi) and frame rate(Fps) which are supported by your driver.
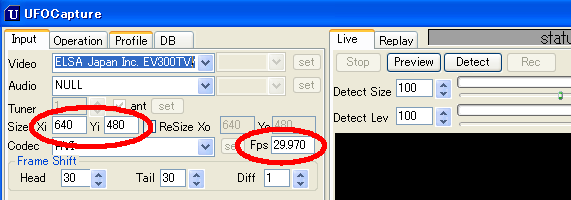
- Example of general settings..
| Input Signal |
Videoformat |
Safety Setting |
High load Setting |
| analog |
NTSC |
Xi=320,Yi=240,Fps=29.97 |
Xi=640,Yi=480,Fps=29.97 |
| PAL |
Xi=352,Yi=288,Fps=25.0 |
Xi=704,Yi=528,Fps=25.0 |
| IEEE1394(DV) |
NTSC |
Xi=360,Yi=240,Fps=29.97 |
Xi=720,Yi=480,Fps=29.97 |
| PAL |
Xi=352,Yi=288,Fps=25.0 |
Xi=720,Yi=576,Fps=25.0 |
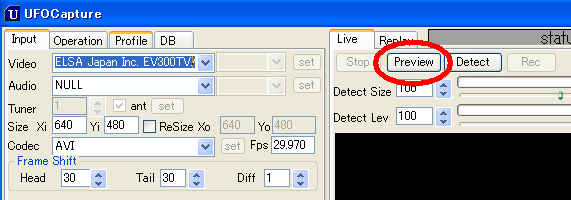
- Push Preview button in Live sheet, and confirm input video signal is shown in live windowB
-
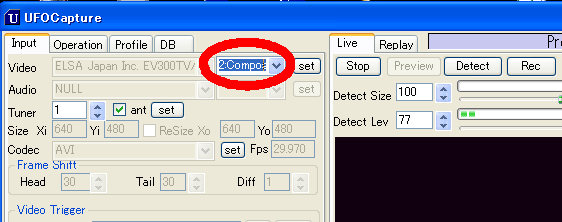
- When your capture hardware has multiple inputs, select prefer input pin in the combo box below during previewing.
- When you get error message, please refer here.
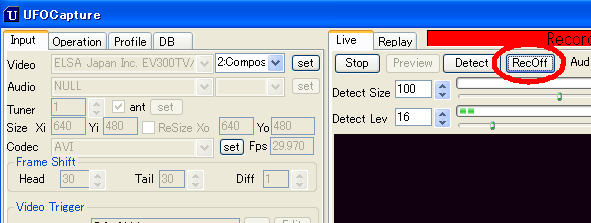
Step 8 Manual recording test.
- Push Rec button in Live sheet, then recording will start.
- Push RecOff button (same position as Rec button), and recording will stop after a few seconds ( time shifted ).
-
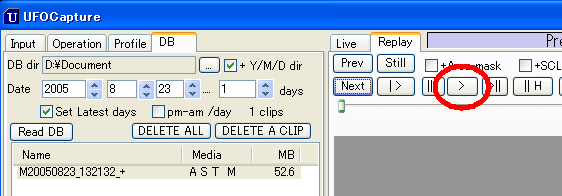
- Click Replay tab to go to Replay sheet, DB sheet will be shown in right area.
- Click clip name(Mxxxxxxxx_xxxx*) shown in the list area, snap shot still image will appear in replay window.
- Click ">" button in Replay sheet, recorded clip will be replayed.
Step 9 Detection test.
- Go back to Live sheet and push Detect button.
- Let input video have some change(ex. move hands before camera), then recording will start automatically and stop when the change is seized.
- Replay and confirm the results. If you got appropriate video clips and still images, all test was passed.
Step 10 Basic setting
- Go to Operation sheet.
- Push Read Settings button and select appropriate default setting.
- NTSC analog input -> NF640x480N.ufi
- NTSC IEEE1394 -> NF720x480N.ufi
- PAL -> PF640x480N.ufi or PF720x576.ufi
- Confirm device name, DB dir and Xi,Yi,Fps settings.
- Do Detection test again, and confirm you can get appropriate results of high resolution.
- Please check CPU load by Task Manager of your system during the test, and confirm the load is below 90%.
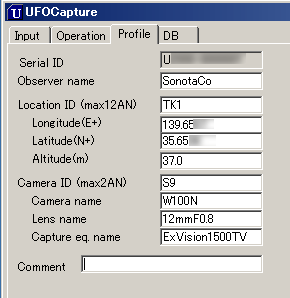
Step 11 Profile setting
- Profile information is used for sun raise/set time calculation, super impose and logging. You should set all information properly.
- ex:
-
-
Here, you have finished necessary settings.
Step 12,13,14 are optional. You can use default parameters.
Step 12 Super impose setting
- Set appropriate super impose format.
- ex:
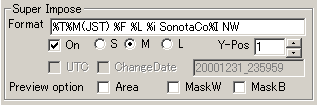
- Size M
- Size S
- You can use "%t" instead of "%T" to get "dd/mon/yyyy" date format.
- When you want to use UTC instead of local time, check UTC check box.
Step 13 Dark object mask setting
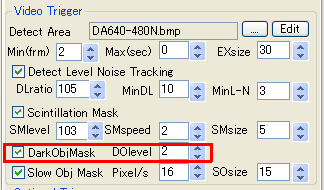
- Dark object mask is not to detect dark movement of dark objects.
- This function is not perfect, but reduces most of detection of birds or insects in night sky.
- Check DarkObjMask check box, set 0 as DOlevel. Normally, there is no need to change it.
- You can set 1 or 2 as DOlevel, this will reduce more, but do not set DOlevel above MinL-N, or you may lose some bright objects.
Step 14 Slow object mask setting
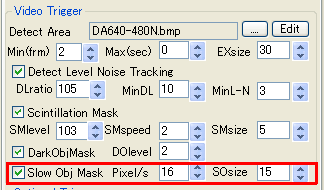
- Slow object mask function tracks the objects that move slowly and mask the area around it in real time.
- Once some object is detected, this function observe it for 3 seconds, calculate its moving speed, and mask it when it is continuous slow moving object
- Set this option ON to avoid the capture of airplanes, OFF to capture all events including airplanes or satellites.
.
- Slow Object Mask area is shown in white rectangle in view area. While gray rectangle is the mark of observing stage.
- Pixel/s : Highest speed of which should be masked.
- Normally 15 is recommended for wide lens. 40 is recommended for narrow lens.
- SOsize : Size of mask pattern (pixel length of the edge of mask rectangle)
- Normally 15 is recommended for wide lens to avoid the effect of the flash lights of air plane.
- This function is very useful to reduce the capture of airplanes.
- There is no need to change this setting unless you change your lens.