UFOCaptureHD2 Quick Start Guide
This document contains a sytep by step guide to build a HD motion-detect-time-shifted-video-recording system using UFOCaptureHD2.
Please refer UFOCaptureHD2 Japanese manual or UFOCaptueV2 English manual for details.
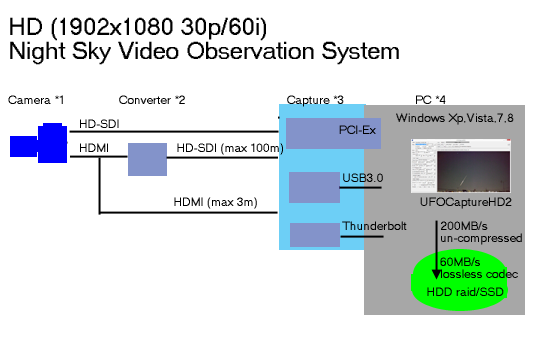
1. Equipments for HD night sky observation
|
System
|
| HD |
 |
| SD |
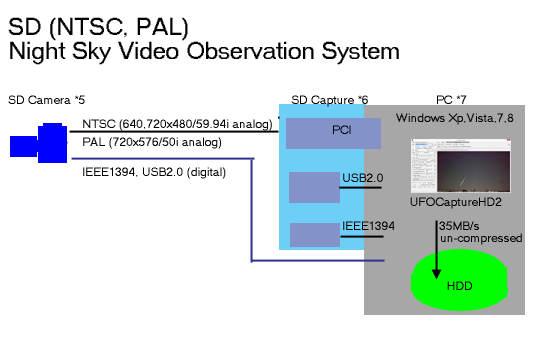 |
- Camera
- HD(ex 1920x1080/60i ) continuous live video signal output .
- Using Windows PC compatible interface (ex. HD-SDI, HDMI).
- ISO12800 or higher (Digital camera), or 0.01lux or better sensitivity (Video camera).
- S/N 30db or better.
- Normal fixed shutter speed and fixed frame rate.
- Slow shutter or frame stacking camera is not usable.
- Lens
- F1.0 or faster for ISO12800, 1/60sec shutter.
- Manual focus or infinete far fix mode.
- Not too wide lens ( mag 2 star must be recognizable on video for scientific measurements).
- Camera mount and housing.
- Video cable
- HDMI cable <= 5m.
- HD-SDI (75ohm single coax cable) can be extended for 20m or more.
- Un-compressed HD video capture device for Windows.
- Capture equipments must not use compressions such as mpeg or H264.
- Compatible with Windows Direct Show un-compressed video capture interface.
- Lossless codec programs (optional)
- Lossless codecs for recording (after detetion) such as Huffyuv can be used.
- They reduces necessary bandwidth and storage size down to 1/3.
- PC
- Windows Xp/ 7/ 8, 32/64bit, any language version.
- UFOCaptureHD2 is compatible all versions of windows, but be careful about capture devices.
- Most of hardware manufacture's device drivers have dependancy of Windows versions.
- IEEE1394 SD capture devices have full compatibility for all windows because its is included in Windows.
- 4 or more thread parallel processing Core series CPU , 2.0GHz clock or higher.
- 200MB/sec band width of storage writing speed for un-compressed 1920x1080/60i recording.
- Ex. 7200rpm SATA HDD x4 Raid0
- One clip (2 seconds, 1920x1080/60i )will be nearly 400MB , 150GB free space for one typical night .
- 70MB/sec for Huffyuv recording.
- Ex. single SSD , HDDx2 Raid0
- One clip (2 seconds, 1920x1080/60i )will be nearly 150MB , 50GB free space for one typical night .
- Capture device interface
- PCI-Ex x1 bus for HD-SDI or HDMI capture device (USB3.0 is not recommended , it has compatibility problems yet).
- GigE , IEEE1394b : not confirmed.
- Thunderbolt : being expected,
- Example HD system for night sky @ Nov/2012
- Camera : Panasonic DMC-GH3 (ISO6400, l/60s, live view mode 1920x1080/60i HDMI output, Shutter lock by release cable is needed for continuous HDMI live view output).
- Lens : Nokton 25mm F0.95 fourthirds.
- Converter: BalckMagicDesign HDMI HD-SDI converter.
- Capture : BlackMagicDesign Decklink SDI (PCI-EX x1)
- Codec : Huffyuv
- PC: Windows 8 64bit, Core i7 3770s, 240GB SATA6G-SSD
- Example SD system for night sky @ Nov/2012
- Camera ,Lens:
- Watec 902H2 Ultimate (NTSC or PAL).+ CBC 8mm F0.8 (used market)
- Watec 902H3 Ultimate (NTSC or PAL) + FUJINON YV2.7x2.9LR4D-SA2
- Capture : Canopus ADVC55(IEEE1394)
- PC: Windows 8 64bit, Core series CPU > 2.0GHz , 7200rpm 2TB SATA HDD
2. Test of Equipments
- Do equipments test first.
- Install device driver and additional software of capture device, and do test of actual recording .
- Confirm stored avi file profile for frame size, frame rate, and bit rate of recorded .
- Play back it and confirm it is smoothly replayed..
3. Download of UFOCaptureHD2 Package
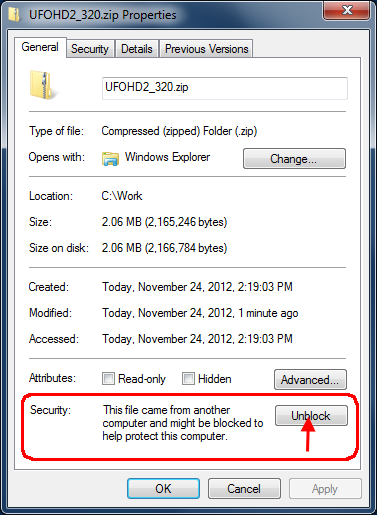
- Download UFOHD2_xxx.zip from SonotaCo.com (http://sonotaco.com/soft/e_index.html)
- Open profile of UFOHD2_xxx.zip file by windows explorer as below and push "Unblock" if the button appears.
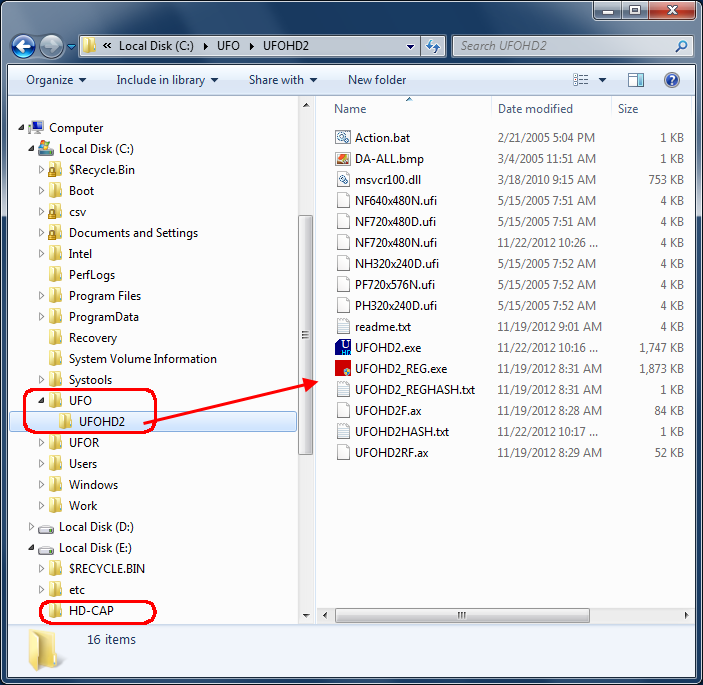
4. Making Diretories
- Make a directory for UFOseries programs ( "C:\UFO " is recommended ).
- This directory should not include 2 bytes characters in its path name.
- It should not be under "Desktop" nor "Users".
- It should not be drive root itself.
- Expand UFOHD2_xxx.zip package, and place UFOHD2 directory to the UFO directory made above.
- Confirm the contents of UFOHD2 directory as the figure blow.
- Make clip root directory (root of captured clip files)
- ex. D:\HD-CAP , or C:\SSD-CAP
- Year, month, day sub directories will be automatically generated by UFOCaptureHD2 .
- The drive of the directory should have enough writing speed and free space (see 1.).
- The drive of the directory should not be used by other programs or tasks while UFOCaptureHD2 is running.
- Ex. Indexing, Automated Backup , Virus scan should be stopped on this.
- Windows update should be set as not to automatic install, but just make update notice.
- Do not put other files under this directory. Manually created files may cause troubles.
5. System registration by UFOHD2_REG.exe
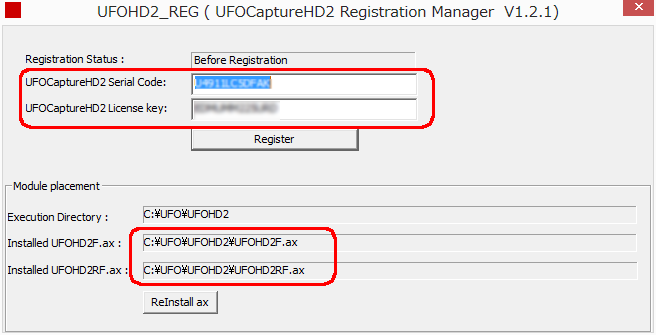
- Execute UFOHD2_REG.exe at first.
- UFOHD2_REG does activeX module registration for the Windows system,.
- UFOCaptureHD2 licence registration can be done at the same time.
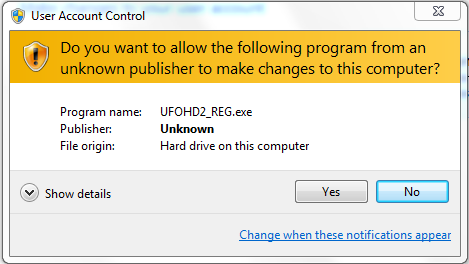
- Push "Yes" if UAC dialog below appears at the beginning of UFOHD2_REG.
- Confirm Module placement section (lower part of dialog) is properly indicating the module in the installed directory.
- Enter UFOCaptureHD2 Serial Code and License key if you have those, and push Register button.
- License registration can be done later.
- In the status of "Before Registration", the detection duration time is limited to 30 minutes. There is no other ristrictions.
- Registration with blank Serial Code cause un-registration of existing license.
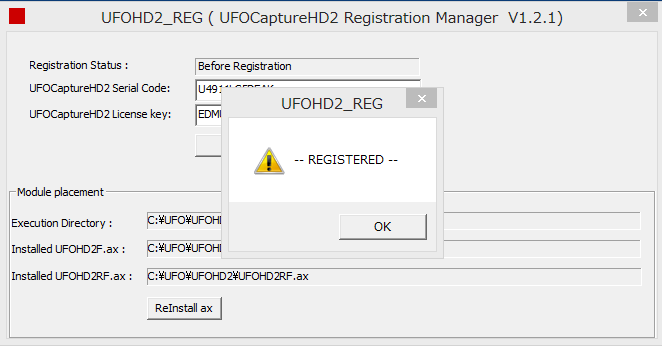
- You will get "-- REGISTERED -- " message like below when the license registration was succeeded.
6. Check of Windows settings
- Disable HDD auto power off setting !! (this is essential on Windows 7,8)
- Control panel -> Power Options -> Change plan setting -> Change advanced power settings -> Hard disk ->Turn off hard disk after -> Never
- Disable Sleep!!
- Control panel -> Power Options -> Change plan setting -> Change advanced power settings -> Sleep -> Sleep after -> Never
- Stop back ground use of capture target storage.
- Check Indexing, Auto back up, Virus scan or other program that may runs simultaneously not to disturb the UFOCaptureHD2 drive usage.
7. Initial setting of UFOCaptureHD2
- UFOCaptureHD2 has default basic setting for night sky HD observation.
- As for SD formats, you can readin stored preset files below.
- NF640x480N.ufi -- Night sky, 640x480 NTSC
- NF720x480N.ufi -- Night sky, 720x480 NTSC
- NF720x480D.ufi -- Day time, 720x480 NTSC
- NF320x240D.ufi -- Day time, 320x240 NTSC
- PF720x576N.ufi -- Night sky 720x576 PAL
- PH320x240D.ufi --Day time 320x240 PAL
- Initial essential settings.
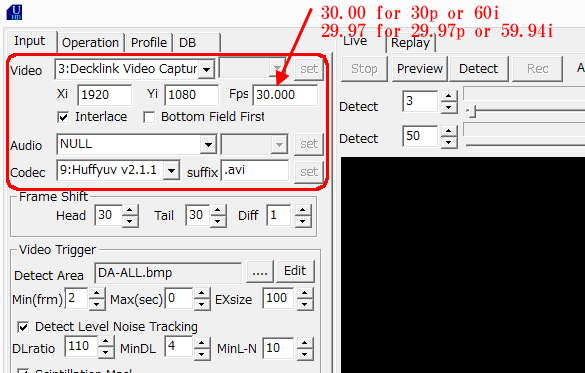
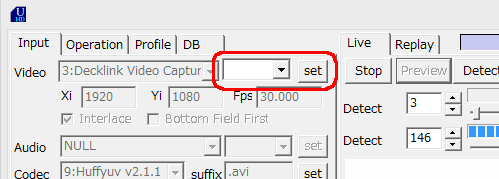
- Select video capture device (Video combo box in Input sheet)
- There are names of video capture devices that is ready on your PC.
- Connect and provide video signal to the capture device beforehand to show up its name here.
- Set Xi, Yi, Fps precisely .
- If this setting is not correct, then you will get "Media type not matched" message at the beginning of preview.
- Be careful format name is not always shows correct Fps, ex. both 29.97 and 30.0 fps are called just 60i or 30p. Check camera and capture equipment's correct value.
- Set Interlace check box ON if you use interlaced video format (ex, 1920x1080/60i, NTSC, PAL).
- Set of f for progressing formats such as 1920x1080/30p, 24p.
- Set Bottom Field First check box ON for the capture device that makes a interlaced field that contains bottom raster as the previous field in time. It is known that all IEEE1394 should be ON, but others should be OFF.
- Select codec and its suffix.
- You should use AVI(un-compressed) or lossless codec and ".avi" suffix for the post processing of UFOAnalyzer.
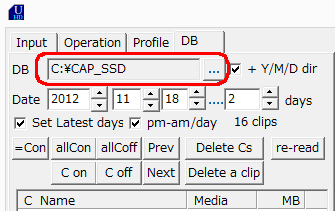
- Set clip root directoyr to the DB text box in DB sheet.
-
8. Preview test
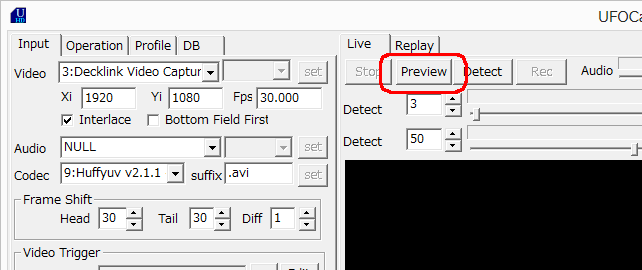
- Provide video signal to the system and Push Preview button on Live sheet , status bar (top of window) will change yellow to light blue and the video will appear on Live sheet.
- If "media type not matched" message appears, check Xi, Yi, and Fps or the Video codec selection.
- If "cannot run graph" message appears, then try AVI(un-compressed) as the codec first.
- If the capture device has selectable inputs, and black screen with only super imposed text, appeared, then try to change the input pin name by the combo box right of the device name.
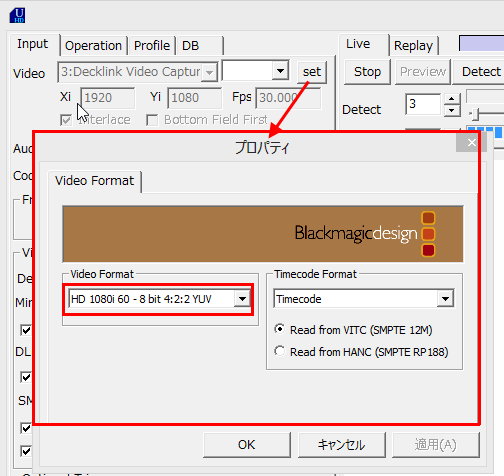
- If the capture device has format setting or other unique controls, then push set button right of device name to tune them while previewing.
-
- You can change super impose setting at the bottom of Input sheet and see its result while previewing.
- Following special characters can be used in the format text of Super Impose section.
- %T : Date and time in Japanese stile like "2005/12/31 23:59:59"
- %t : Date and time in English stile like "31/Dec/2005 23:59:59"
- %M : Milliseconds of time.
- %m : 100 millisecond of time .
- %C : Clip number from the beginning of detection
- %F : Frame number
- %L : Detect Size, Detect Lev and detection mark
- %I : LocationID and CameraID which is assigned in "Profile" sheet
- %i : Camera name and Lens name which is assigned in "Profile" sheet
- Check CPU load while previewing by Task Manager or Resource Monitor of Windows.
- Confirm the heaviest load of threads is not over 90%.
- If one core/thread CPU load reaches 100% , system becomes unstable and broken video files will be stored., even the average CPU load is low.
- Push Stop button on Live sheet to stop previewing.
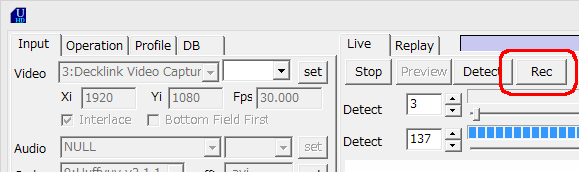
9. Recording test
- Push Preview and push Rec button on Live sheet to begin time shift recording. Status bar will change to red.
- Push RecOff to stop the recording.
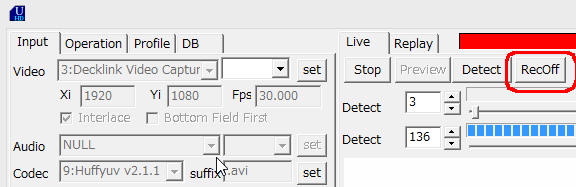
- Recorded video clips will be shown in clip list on DB sheet.
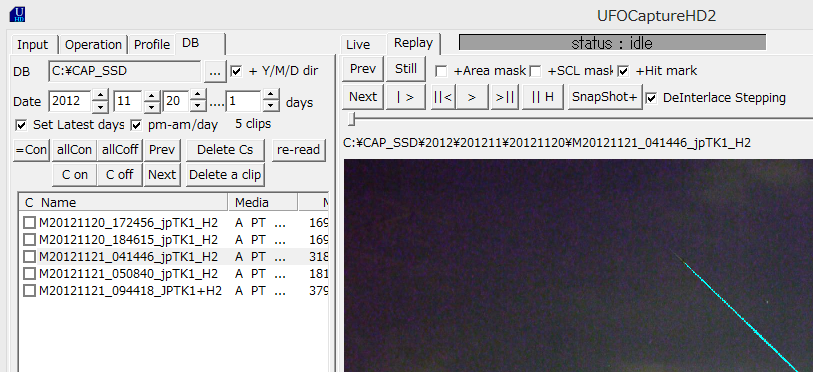
10. Playback test
- Click a clipname in the clip list on DB sheet to select the a clip. Then still image (peak hold or snap shot) will be shown in Replay sheet.
- Click screen or ">" button to play back the movie on the Replay sheet.
- Check the video is smoothly replayed.
- If it is not smooth, then try pushing frame stepping button ">||" to confirm all frame images are recorded or not.
- If frames are leaped or missed in recording, then confirm the storage writing speed written in 1.
11. Detection test
- Push Detect button on Live sheet, status bar will change to blue within a few seconds, and detection begins.
-
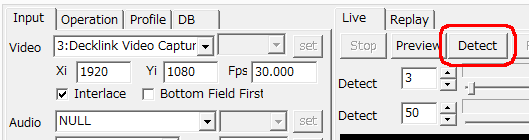
- Give some big change in the view (ex. cover lens or put a light into the lens) then status bar will change to red and recording will start and the recording will stop 1 second after the change stopped.
- Push Stop button, go DB sheet and check stored clip.
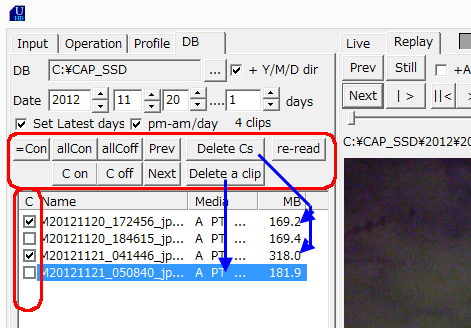
12. Clip selection/deletion
- A clip is a set of files below. All files that has same time-id field (*) deleted at a same time.
- M*avi : movie file that has suffix assigned in Input sheet.
- M*P.jpg/bmp or M*S.jpg/bmp : Peak hold or snap shot still image.
- M*T.jpg : Thumbnail image.
- M*M.bmp : Map file (an image that contains mask and average brightness information for UFOAnalyzer)
- M*.xml : Profile information for UFOAnalyzer.
- Push Detele a clip button in DB sheet to delete a clip selected in the clip list .
- Push Delete Cs to delete all clips that have check ON in the clip list.
- all C on button to set all checks ON.
- all C off button to set all checks OFF.
- =Con button to check ON of all clips that have "=" in its name (time interval triggered clips).
- C on button to check ON of a selected clip, and the select ion moves to next.
- C off button to check OFF of a selected clip, and the select ion moves to next.
- Next button to move selection to next clip.
- Prev button to move selection to previous clip.
----------------------------------------------------------------------------------------------------
- This is the end of essential setting and test.
- Close UFOCaptureHD2 once by clicking X button right top of the window to save all settings to "Settings.ufi" file in the UFOHD2 directory.
- Now, UFOCaptureHD2 is ready for detection.
- Yet, following settings, step 13. - 19. are very important for continuous observation.
- It is strongly recommended to finish all of them.
------------------------------------------------------------------------------------------------------
13. Profile setting
- Information in Profile sheet is used in sun rise /set time computation and they are passed to post analyzing processes via xml file.
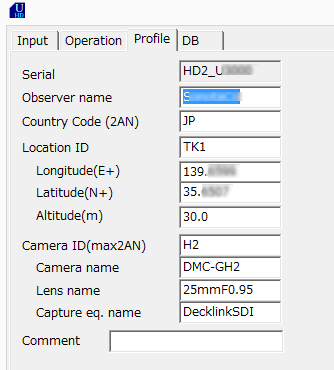
- Observer name : max 20AN free format.
- Country Code : none or 2 alphabets country code that is defined in ISO316601 alpha-2 should be used.
- Location ID : max 12AN, unique identifier in your simultaneous observers(should be unique in a country or region).
- Longitude : Longitude on WGS84 system.
- 4 digit after decimal point in degree is required. (NOT deg min sec).
- East is plus, West is minus.
- Latitude : Latitude on WGS84 system.
- 4 digit after decimal point in degree is required. (NOT deg min sec).
- North is plus, South is minus.
- Altitude : Location height in meter above sea level .
- Camera ID: max 2AN, Unique identifier of the camera in the location.
- Camera name, Lens name : max 20AN that can be used in super impose setting.
- Capture eq.name : max 20AN, name of capture equipment.
- Comment : max 80AN, free comment .
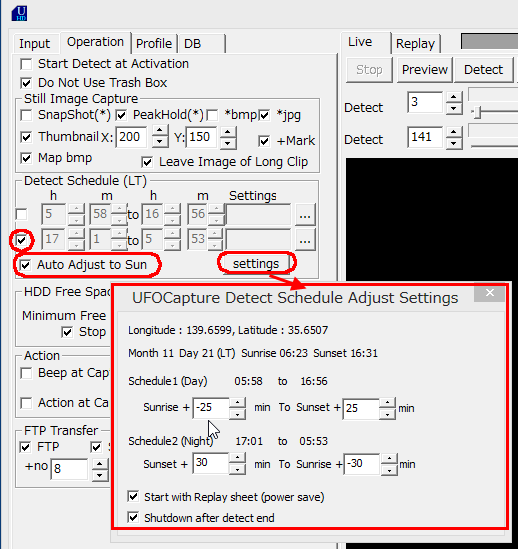
14. Schedule setting
- By checking Auto Adjust to Sun check box, and the second checkbox of Detect Schedule section in Operation sheet , detection will automatically begin and stop while night time.
- Relative offset to the Sun rise and Sun set , and additional operation (shutdown) can be set on the dialog appears by settings button in the section.
15. Area mask setting
- Area mask can be used to eliminate the influence of ground scenery or hotpixel of CCD.
- Area mask can be edited on the actual FOV image by area mask editor.
- Preview and Stop once to set the real video image to background.
- Push Edit button in Video Trigger section in Input sheet to open the area mask editor.
- There are color and shape selection on the editor.
- Make mask(dark red) on all ground objects and hot pixels with a few pixels margin.
- A few pixel mergin is important for scintillation mask.
- Save with proper name, then it will be used for further detection.
- Do not remove or edit "DA-ALL.bmp" itself. It is special bmp that cause all area detection on any resolution.
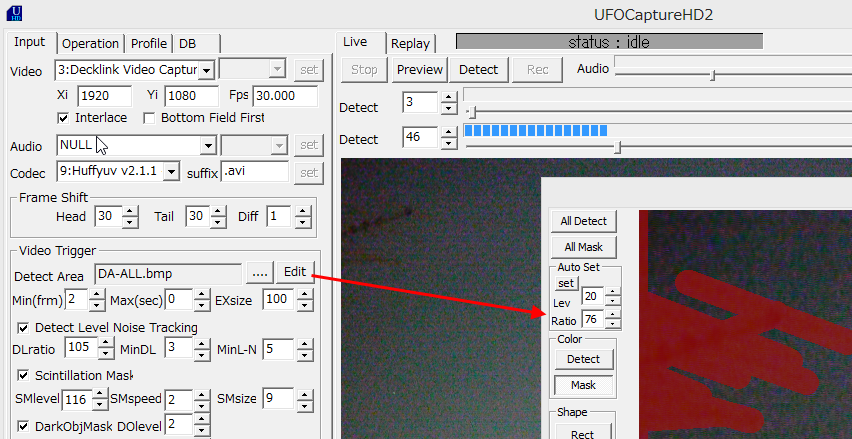
- You can see the area mask area by checking Area in Super Impose section.
- This check box should be OFF for usual detection, if ON, it will appear on all captured still images.

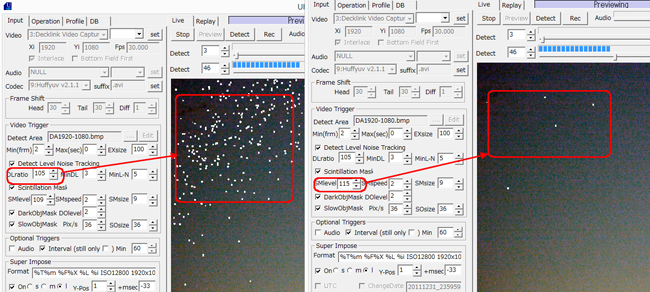
16. Scintillation mask tuning
- Scintillation mask masks blinking stars in night sky automatically and improves motion detect sensitivity dramatically.
- You should tune SMlevel to mask stars appropriately. This should be done in a night with clear sky.
- Check SMW checkbox in Super Impose section, then the scintillation mask patters are shown as white circle on the video.
- Left image below is too many masks, it is caused by too low SMlevel.
- In this case, increase SMlevel to be appropriate mask like right image.
- The ideal state is that there are 10 or more visible stars in the video, and 30 or more scintillation mask are generated.
- UFOCaptureHD2 will find invisible dark stars that may blink sometime in the video by realtime image processing.
- Those masks will be used in UFOAnalyzer as the hint of star position that is necessary for automatic precise measurement of direction.
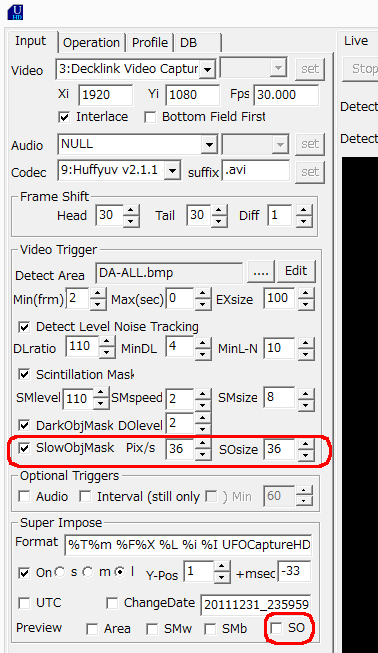
17. SlowObject mask tuning
- SlowObject mask masks most of very slowly moving object such as airplanes or satellites.
- UFOCaptureHD2 tracks the movements, and measure their velocity within a second, and masks it with a rectangle area, if the object is slow. Recording that has started by it will be canceled if there is no other triggers.
- The velocity and the size can be assigned as Pix/s and SOsize(pixel) in the Video Trigger section.
- Slow object mask can be seen on the video by checking SO checkbox ON.
- SO super impose option should be OFF for usual, because it consumes CPU power a lot when a big change like a flash appears.
18. Detection thresholds tuning
- UFOCaptureHD2 has 3 threshold levels concerning video trigger.
- 1) Detect Lev.
- Detect Lev is the brightness difference value between two frames of a same pixel.
- Difference is taken between current frame and a frame Diff (setting in frame shit section)frames before.
- Detect Lev is usually automatically controlled by Detect Level Noise Tracking function.
- DLratio 110 is the default , it means Detect Lev = 1.1 * noise level.
- DLratio 105 can be used for very sensitive detection.
- MinDL is the lowest Detect Lev value setting in automated control.
- MinDL is effective for a very low noise system to keep Detect Lev not too small.
- MinL-N is the minimum difference between Detect Lev and noise level.
- MinL-N = 5 for very sensitive system.
- MinL-N = 10 or more for noisy system to avoid too many triggers.
- 2) Detect Size
- Detect Size is the number of pixels that have changed more then Detect Lev1).
- Detect Size 3 is the standard sensitivity for meteor detection.
- Detect Size 2 can be used for meteor detection, but it might be to sensitive for noises.
- If the purpose is TLE only, then 50 or more will effectively eliminate other events.
- 3) Duration of the change.
- Min(frm) is the number of continuously changed frames by which video trigger should be asserted.
- 3 is typical for meteors.
- 2 can be used for TLE observation.
- EXsize can override the Min(frm) setting.
- An Event that has Detect Size > EXsize, will cause video trigger even if it is only one frame.
- This makes exception for TLEs on meteor detection system.
- EXsize = 0 disables this exceptions. Let it be 0 when a flash of lightening happens too many.
- Recommendations on a normal FOV(not allsky) and not noisy (S/N 30db or better) system.
- For meteor and TLE : Detect size=3, Min(frm)=2, EXsize=50.
- For meteor only : Detect size=2, Min(frm)=2, EXsize=0.
- For TLE only : Detect size=50, Min(frm)=2, EXsize=50.

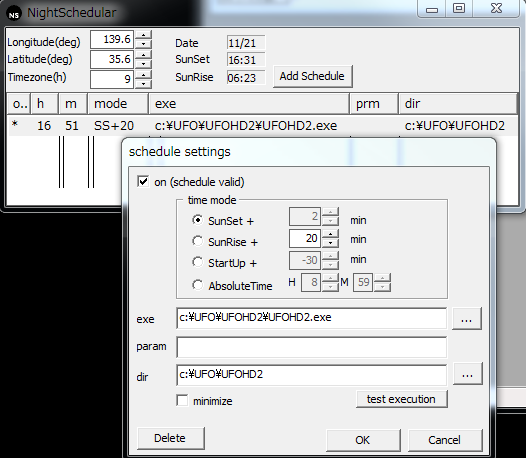
19. Auto start of UFOCaptureHD2 by NightScheduler
- NightScheduler is a program launcher on Windows that can be set by relative time to the Sun set/rise, made by SonotaCo.
- NightScheduler is downloadable as http://sonotaco.com/soft/download/NS001.ZIP
- You can start UFOCaptureHD2 by NightScheduler at a relative time to the Sun set.
- NightScheduler is also effective to avoid Low priority I/O feature of Windows Vista.
- Low priority I/O feature force the I/O(ex. HDD writing)speed to very slow for the program that was started by Startup of Windows.
- So you should not register UFOCaptureHD2 as a startup program of Windows , but register NightScheduler and activate UFOCaptureHD2 by the NightScheduler.
Ba ck